MIAD Project 1
|
The Hmong in Milwaukee
Medium: Ink on tyvek Size: 91.44 cm by 91.44 cm Date: Nov 9, 2018 |
Exhibition Text
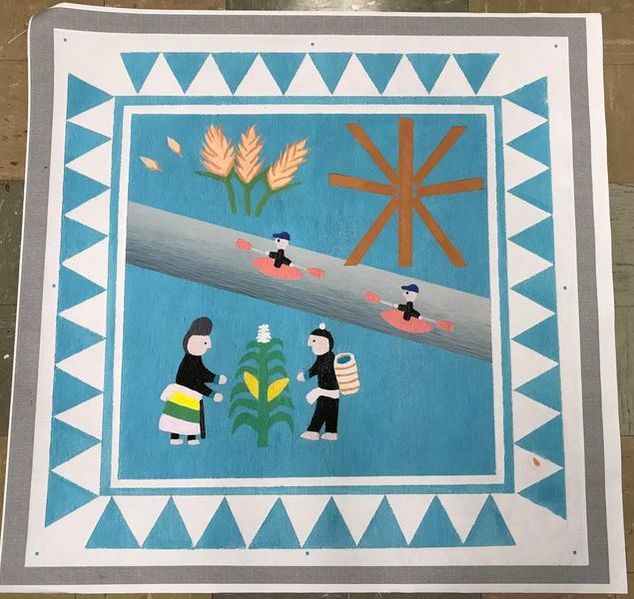
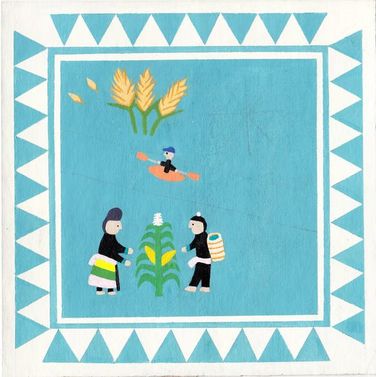
To represent the community, I chose to represent the Hmong community in Milwaukee. Although it is a large and growing population, it remains overlooked. To spread awareness of the presence of the Hmong in Milwaukee, I chose to create a traditional Hmong cloth to mix the Hmong culture with the culture of Milwaukee.
Inspiration
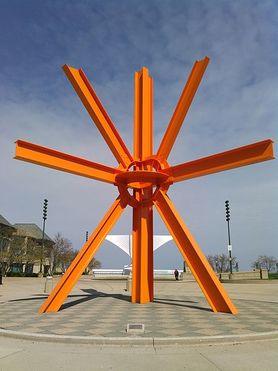
"The Calling"
1982
Mark di Suvero
1982
Mark di Suvero
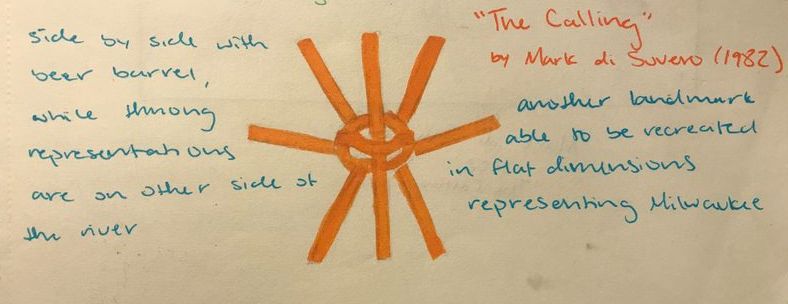
Because I needed Milwaukee representation in my piece more than once, I searched for a popular landmark that is very well known, yet would also be able to be manipulated into a flat figure along with the rest of the images. My mind came across the wings of the Art Museum, Miller park, the Mitchell Domes and more, and none of which caught my attention, and I don't believe any of them would match the simplistic figures on the rest of the piece. I simply searched "Milwaukee" on the internet and I was reminded of the large architectural piece of art sitting alongside the lakefront. It fit perfectly with the other uncomplicated stencils I would use and could easily be traced into a flat figure.

|
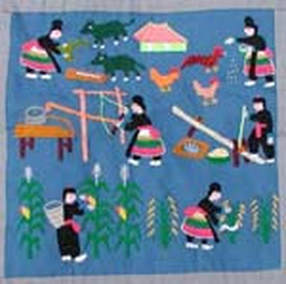
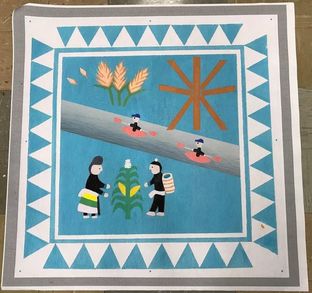
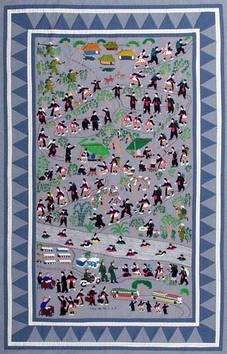
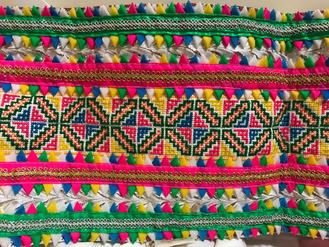
Community is already perfectly represented in my everyday life. In the Hmong culture, story cloths are sewed together to tell the experiences of the Hmong community. They are easily identified by their traditional shades of light and dark blue, along with their geometrical borders (often triangles) and their busy and complex details placed inside the borders. They are often created to tell the stories of immigrating from Laos to Thailand during the Secret War, others may show the everyday life of a Hmong person and their roles. Considering my project was to bring attention to the Hmong community in Milwaukee, it only made sense to incorporate culture and tradition into it.
|
|
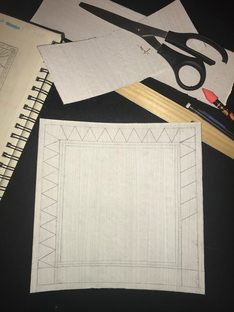
Planning Sketches
|
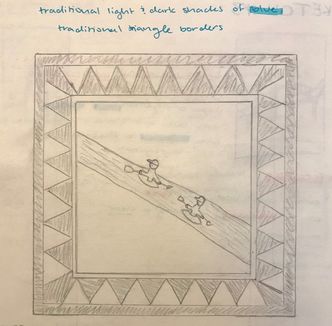
Immediately, I knew I needed to include the triangular border that all Hmong story cloths have. With doing research and reviewing many different cloths, I discovered that shades of blue are most commonly used for the triangles. They also include multiple layers of outer lines and inside lines.
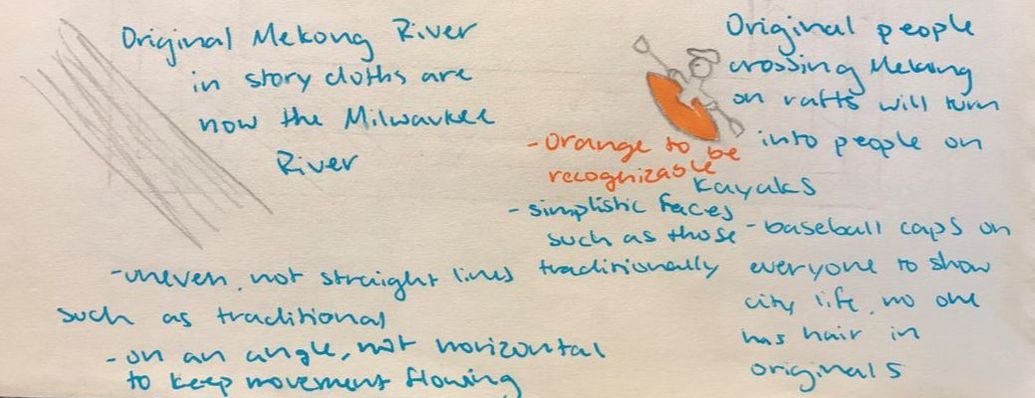
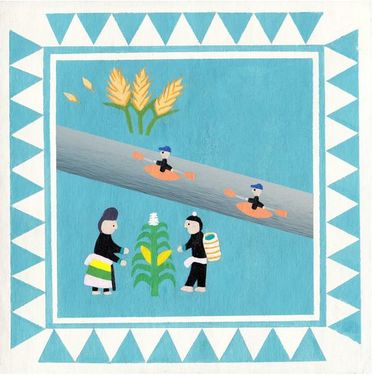
One of the greatest challenges for the Hmong while escaping from Laos included the crossing of the Mekong River. In traditional cloths, people can be seen crossing with rafts, while others swam. The river is one of the most important aspects in the story of the Hmong, and it is equally important in Milwaukee, as the Milwaukee River. I also felt it important to change those on rafts to Milwaukee based activities, such as kayaking.
|
|
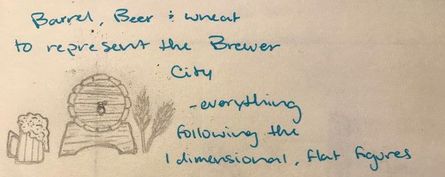
To further represent the city of Milwaukee, I looked into what the city is mostly known for. With a sports team and ballpark to support the name, beer is one of the most popular products known to the city. I wanted to represent this with a beer barrel alongside an overfilled glass and stalks of wheat.
|
|
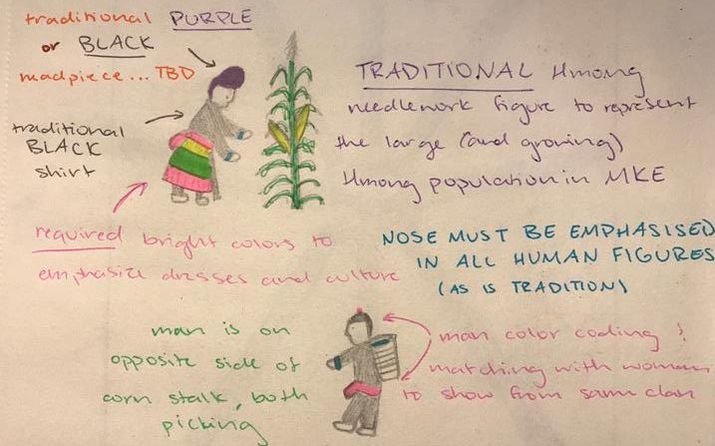
To incorporate the Hmong and their commonly played roles into the background, I decided to recreate the pair of man and woman seen in one of the inspirational figures. They are seen picking corn, wearing traditional clothes while color matching to represent their origins of the same Hmong clan.
Lastly, I wanted to include a Milwaukee landmark that is easily recognized as my stencil. After considering buildings such as the art museum or Miller Park, I came to the conclusion of buildings being too three-dimensional to fit in with the flat figures of the people and the river. However, when I came across "The Calling" by Mark di Suvero, it fit perfectly with the flat figure theme and would be able to be recreated easily with its repetition of straight lines and symmetry.
|
Process
|
My plan was to paint the entire background, although I had the option to complete it over Photoshop. To paint, I spread Gesso over a piece of cardboard. However, it was too large to be able to fit onto the 11x8 scanner once I was completed, so I cut the cardboard into a square of 8x8. After cutting, I measured a 1/4 inch of outline for the outer border, then a 1 inch border to hold the triangles. I then traced the very inside borders to be 1/4 of an inch combined, to later incorporate the pattern of color. Creating the triangles, I made each 3/4 of an inch thick, with 9 on 2 sides and 8 on the others. Only one set of parallel sides would include triangles perfectly meeting the corners of the inner borders, to create that symmetrical negative space seen on each corner of the piece.
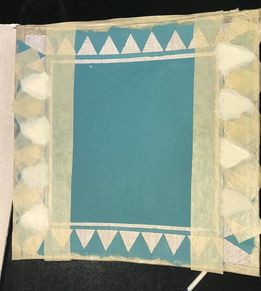
Using a method of outlining with tape, I taped over the tracings with Scotch tape and painted the corresponding triangles and borders with the final blue I had created. Once the blue had completely dried, I peeled off every piece of tape and repeated the taping process once again to coat the white. The process needed to be repeated multiple times in order to paint over all sides for the triangles as well as the inner and outer borders.
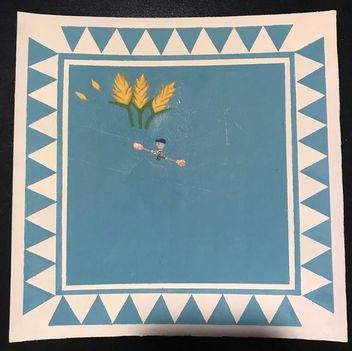
Once the border was completely painted and dried, I first outlined the wheat for size and placement with pencil so I could make easy adjustments. I then painted the stems original dark green, and painted the actual wheat a mixture of linen and yellow. Once the green and darkened yellow were completed, I traced over the bottom edges of each grain with a brown to emphasize the shape of the wheat and the grains.
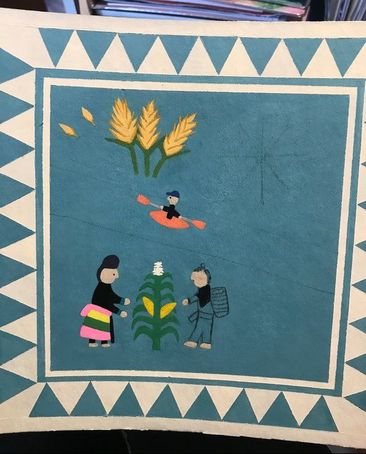
Using the same pencil outline method, I created the man on the kayak. Instead of tracing him directly in the middle of the river, I placed him a little to the left of it, planning to Photoshop and duplicate another kayak-er behind him. I chose black for his shirt because people are normally seen wearing black on traditional story cloths. Orange was chosen for the kayak in order for it to stand out on the background, also as they are seen on the actual Milwaukee River. Lastly, blue was chosen for the hat because all people are seen wearing hats in story cloths, and I painted a blue baseball cap to represent the blue Milwaukee Brewers hats very often seen around Milwaukee. The original color of linen was used for his skin tone, as it already had the lightly colored flesh as they do in the authentic story cloths. For the bottom portion of the piece, the corn stalk was painted first, using the original color green that I had. The center stalk was painted first before the corn or leaves to ensure that it would stand at the right length and stand straight. The corn was then painted angled and placed in a position for the people in the figure to also be placed in a position of picking. Corn was put on both sides rather than just one to have both figures in action. After, the leaves were painted using the same green. Finally, the thin top to the plant was created by covering only the tip of the paintbrush to create a finer point. To make the color stand out, the brighter and bolder white was used.
For the man and woman figures, the woman was painted first in order to work from left to right. Using the same linen color as the kayak-er, the head was painted first. This made it easier for the straight lines of the headpiece and her shirt to be made with clean lines. The same color was also used for the feet and hands. For both the man and woman, the clothes were painted as layers the way the clothes would have been put on. The shirt painted first, the skirt/pants second, then the waist band, and finally the headpieces. The most challenging part of creating the people was painting the small indent in their faces for their noses, as the paint brush was difficult to manipulate in such a subtle way. Lastly, the eyes were painted onto the man and woman by dipping and end of a toothpick into black paint and carefully placing it onto a spot near and above the nose. The eye could only be done once because painting it over multiple times would create too big of an eye.
The last component to paint was the man's basket. Using the original turquoise and the same linen color, I covered the inside and outside of the basket, later outlining with a darker color of brown to give it the emphasis of its circular shape. Once painting was completed, the 8x8 cardboard was scanned and uploaded to Photoshop to include the Milwaukee River and the second kayak-er.
|
Once the cardboard was scanned, the first thing to do was duplicate the kayak-er by using the quick-selection tool, then smoothing out any unwanted background. Two copies were made of the kayak-er: one for the further back kayak-er and another to paste above the river, however in the same exact spot. The river was taken from the picture on the right of Lake Michigan. Using the rectangle tool, a portion of the water was outlined, copied and pasted onto the story cloth. Then using the transform tool, I rotated the river to the angle intended. The rectangle tool was used again to outline any part of the river that reached outside of the borders, and they were then erased.
|
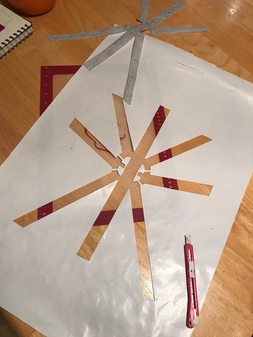
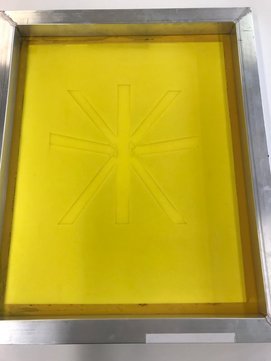
Now that the Photoshop portion was completed, the stencil needed to be cut to be taken to MIAD. First, I cut out wax paper and drew my stencil to an appropriate size. Since my background would have a size restriction for the stencil, I had to do math in order to calculate exactly how big it could be. On the 8x8 cardboard, there was 1 inch of open space for my stencil. Because the canvas was 36x36, I had to convert the fraction 1/8 to x/36, which turned out to be 9/2, converted 4.5 and finally multiplied by 2. My stencil could be 9 inches tall, which worked out in the end. I was finally able to trace and cut out the stencil to an appropriate size. Once tracing was finished, I went over the lines again with an X-acto knife and ruler.
Finally, the stencil was placed onto the tyvek and the ink was successfully transported onto it, finishing my piece. Since the ink did not dry for a long time, all tyveks were required to be hung on a drying rack before being rolled up to avoid stains on unwanted parts of the piece.
|
Experimentation


|
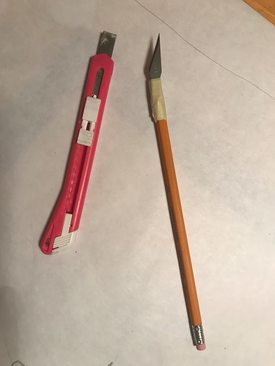
I took the process of cutting my stencils outside of the classroom and at home, bringing with me only blades rather than the entire handle. I originally began with using my own retractable X-acto knife, however it did not have a sharpened point and had residue from previous projects. Because it lacked the sharp edge, it became difficult to control the direction of the knife and it did not cut as smoothly as the brand new blade did. I decided to use the brand new blade, and discovered that the closest innovation I could get to an X-acto knife handle was holding the blade to the end of a brand new pencil, sitting the flat ends together and tightly taping them together with scotch tape. It worked very well, the cuts were much smoother and the blade did not need to be pressed down on very hard because the sharp edge made it easy to puncture the paper.
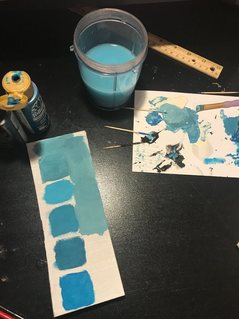
Next was to find the correct shade of blue wanted for the background. Starting with the original acrylic "Azure Blue" I had, I began to mix white with it. Because the original gloss finish acrylic "Wicker White" was too bold and bright, I used a more subtle and dim matte finish acrylic "Vintage White" paint in order to not overpower the blues. Using the more dim white, i did not have to mix any colors with it in order to make it visually pleasing, making it an easier step in the process.
Only one portion for the river was chosen, but I copied multiple to choose from. Using the same rectangle tool technique, I chose different parts of the original picture to choose from different movements of the waves and different colors. The first one copied was too far into the distance to be a good enough quality picture and the color was not bold enough to seem like water. The third picture was closer in terms of distance and captured the wave movements well, however the water was too dark for my liking. The second picture was used in the final piece, as it was found in between the two distances, was good enough quality to show the waves, and not only showed a nice color, but captures the gradient of the lighter colored water transforming into a darker color.
|
Reflection
I am very happy and pleased with how the final piece turned out. Because I chose to paint almost all components the process of completing took a very long time. However, it's the great amount of time and effort put into the project that makes me even more proud with the result. I am proud of the paint job on the border and how I included the main aspects of a traditional Hmong story cloth into my own piece with a mix of Milwaukee into it. Originally, I planned on using colors of darker blues or grays for the border, but I am glad I chose brighter colors such as the white. Brighter colors will be more noticeable from far away and easy to find the projects that are mine. I am also pleased with how clean the lines of paint turned out, both in the border and in the man and woman, especially because no tape outlining was used for the man and woman.
If I were to take anything back from this experience, I would learn from my work on the stencil. Applying mathematics to the project was something I was glad to have caught when I did, because I witnessed others struggle because of the size of their stencils not fitting their backgrounds. Most importantly, I learned exactly how hard a squeegee should be pressed when applying ink to tyvek. The first round of pressing the ink on, there were some spots left throughout the stencil that were were not covered or were uneven. When I placed the frame back down to press the ink again, the image shifted very slightly, not creating a doubly image but causing it to be a bit blurry. The stencil, however, has no complex design to it, and can still be easily identified.
Most importantly, I am proud of how I represented the Hmong community in Milwaukee in order to spread awareness and appreciation. The Hmong story cloths are very critical to our culture, and the idea of community is interpreted through these cloths whether they be about history or personal experiences. I am proud to have been able to take the chance that I was given to represent myself and my culture, and it will not be the last time I do.
ACT Responses
Clearly explain how you are able to identify the cause-effect relationships between your inspiration and its effect upon your artwork:
The flat figures created in the real story cloths are flat because they are made with thread. I could have created the figures in my piece 3 dimensional, however I wanted to stay true to the overall image of the authentic cloths.
What is the overall approach (pov) the author (from research) has regarding the topic of your inspiration?
The reason for the creations of the authentic Hmong story cloths were for the creators to tell their stories. That may vary from a small portion of their to their entire life story, or certain experiences such as life on the farms in Laos, childhood, or the most common; fleeing from Laos to Thailand. I understand the importance of their stories considering it was my own family that experienced it, and I decided to express it even further with incorporating their place in Milwaukee into my piece.
What kind of generalizations and conclusions have you discovered about people, ideas, cultures, etc. while you researched your inspiration?
Authentic story cloths are made with thread and needle, every line of work consisting of repetitive wrist action. If I had the time and materials, I definitely would have made my own with needle and thread. However, by just painting, this project took long hours and was mentally demanding. For a bit I was confused as to why someone would want to dedicate so much into a project, and it wasn't until I completed mine that I realized how much they can really mean. I came to the conclusion that those who commit to a project like this realize how much their experiences matter in the world and how they deserve to be told. Whether they be pieces meant to be kept personal or a piece for the public, they are made to keep their stories alive and to build something that will outlive them. +
What was the central idea or theme around your inspirational research?
The central idea was telling the story of their personal lives or just of the Hmong community.
What kind of inferences did you make while reading your research?
Inferences I made included the story cloths being made in order to keep their stories alive, as well as using it as a way of accepting the occurrences (mostly negative) that helped shape them.
Bibliography
“Hmong Needlework: Traditions Both Ancient and New.” Womenfolk: The Art of Quilting: Patterns & History, www.womenfolk.com/quilting_history/hmong.htm.
“The Calling (Di Suvero).” Wikipedia, Wikimedia Foundation, 19 June 2018, en.wikipedia.org/wiki/The_Calling_(di_Suvero).
“Science Buzz.” Ten Tips on Becoming a Paleontologist, www.sciencebuzz.org/museum/object/2004_08_hmong_story_cloth.
“The Calling (Di Suvero).” Wikipedia, Wikimedia Foundation, 19 June 2018, en.wikipedia.org/wiki/The_Calling_(di_Suvero).
“Science Buzz.” Ten Tips on Becoming a Paleontologist, www.sciencebuzz.org/museum/object/2004_08_hmong_story_cloth.
MIAD Project 2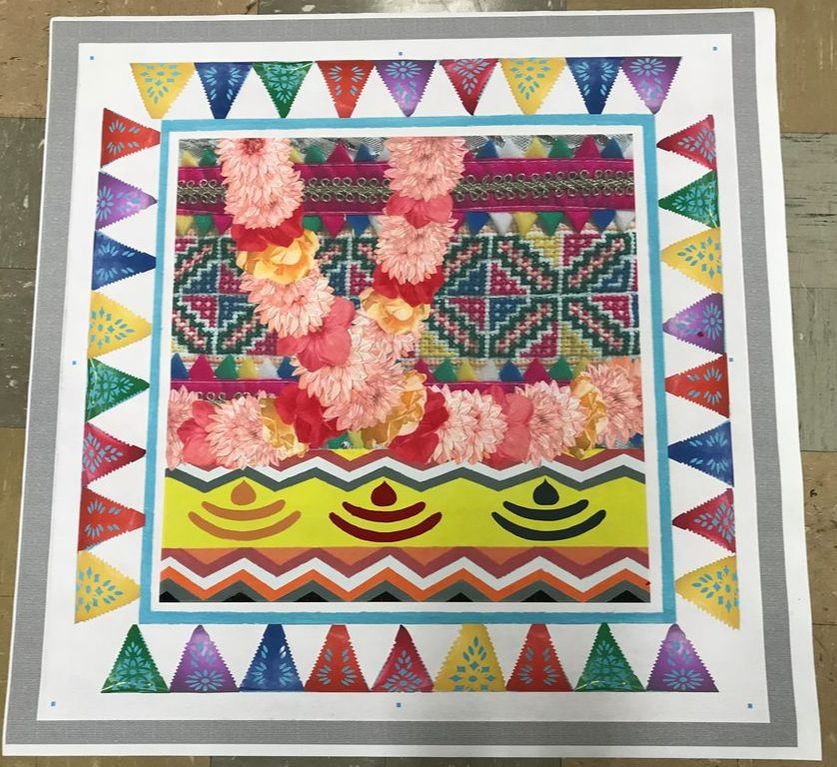
|
Color
Medium: Ink on tyvek Size: 91.44 cm by 91.44 cm Date: Nov 9, 2018 Exhibition Text
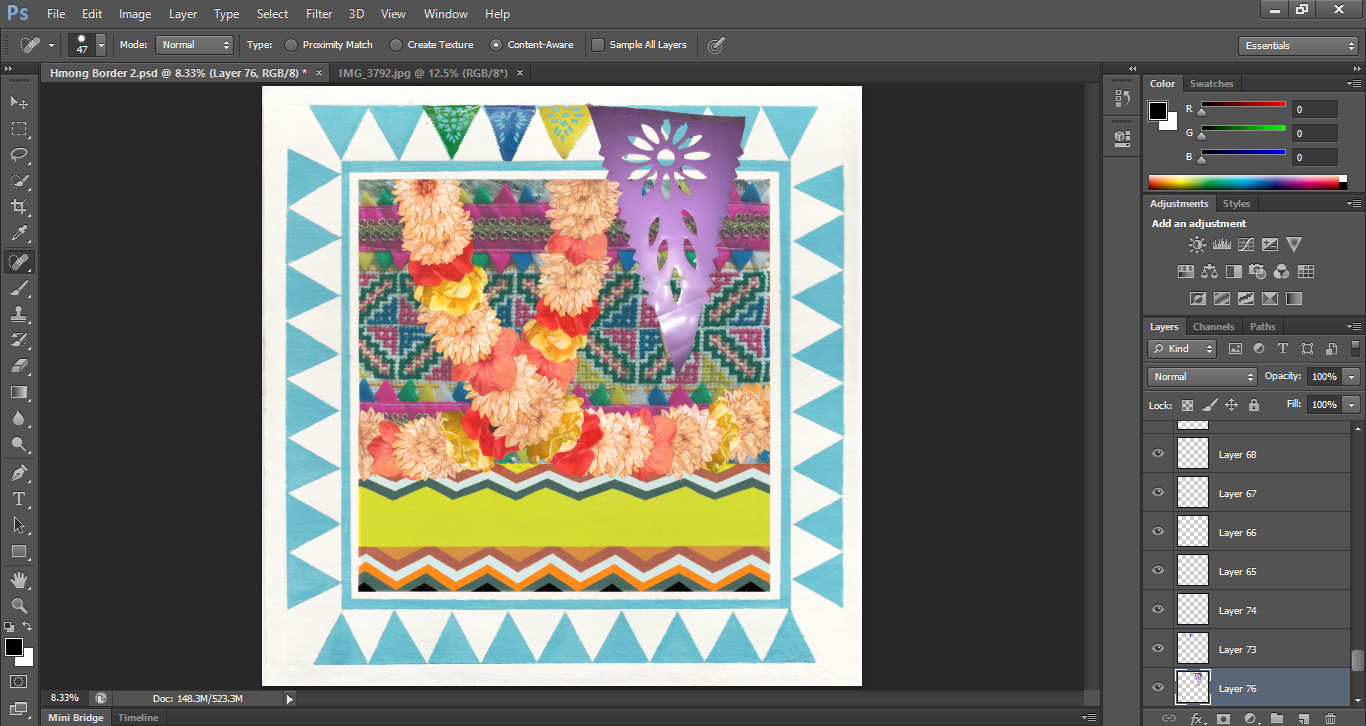
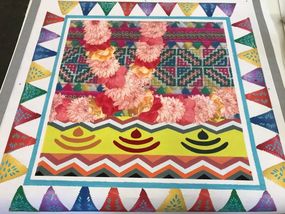
Color was created to display the diversity that I am surrounded with every day of my life. I incorporated a number of different cultures by including designs and traditional objects. Reusing the blue and white Hmong background from the first project, I built my new project around it in order to keep in the Hmong culture.
|
Inspiration

|
Like the first piece, I chose to keep the Hmong border from traditional story cloths to represent the Hmong community I'm surrounded by. Because I used the border from the first project, I was not able to start my second project until the first one was completed. Also, by using a patterned border, my piece would be able to be easily noticed on the building.
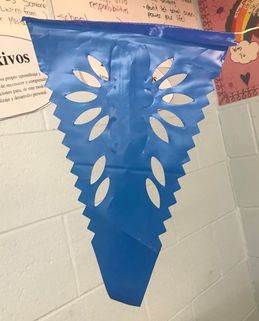
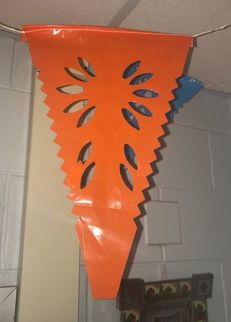
Since I am also surrounded by Mexican culture, I definitely wanted to represent that in my piece. There is no other commonly known decoration to the Mexican culture than papeles picados, mostly hung around houses and buildings at the time of the Day of the Dead. Using these decorations would also give my piece a lot of color.
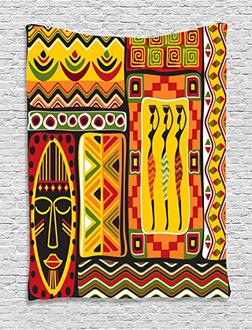
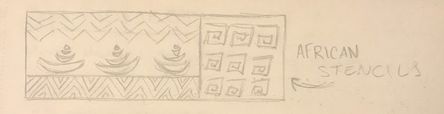
Wanting to include the African culture and designs within my piece, it was not easy to find one that was able to be recreated. My original idea was to have traditional African clothing for my inspiration, however when I conducted the research I concluded that the patterns found on clothing was too complex and could not be easily recognized as African once apart from the clothing. My searches took me to modern African decorations/designs, and I came across patterns that could be recreated while also being recognizable.
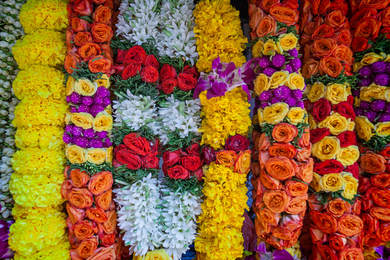
Aside from los papeles picados hanging in the piece, I wanted more decorations showing movement across the piece. For the Indian representatives, I had to reach out to a friend and ask of any traditions, more specifically decorations, that could be easily reproduced and included in my piece. He mentioned garlands, and after conducting my research I noticed that the hanging flowers were most commonly orange, red and yellow. My original idea to reproduce these garlands was to paint them onto my piece.
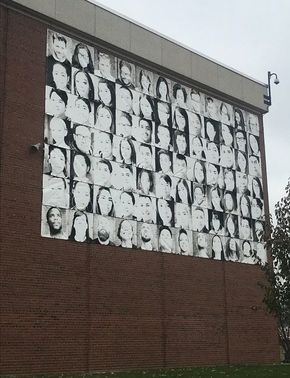
The biggest inspiration for me was the collage of Reagan students and teachers in the front of the building. I pass it everyday and make nothing of it, however I realized how it captures the beauty of community throughout the school. Looking closer at all the faces, I took note of how many colors everyone came in. I wanted to represent that in my piece, to fully explain the real community I'm constantly surrounded by.
|
Planning Sketches
|

|
|
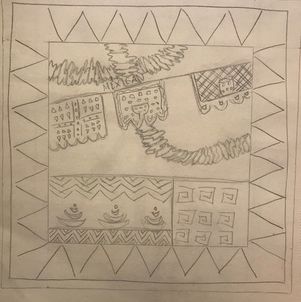
For the first rough sketch of my piece, I included the Hmong border, however did not include any of the same figures inside the border. I decided to include cultures that I've seen the most throughout my life, which are Mexican, Indian, and African. for the Mexican portion, I knew immediately to use traditional decorative papers used for Dia de los Muertos called "papeles picados". Since I could easily find pictures of some, I knew they would be the photo shopped portion of this piece.
Process |
For the African portion, I followed the modern day designs found in the inspiration. I followed the two side by side designs with the intentions of using the stencils as the figures on the right and bottom.
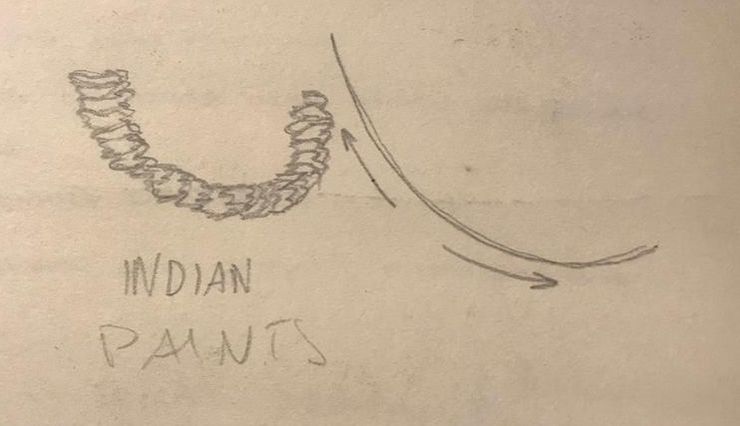
My idea for the garlands was to paint them so I would not have to take individual pictures of flowers and Photoshop them together. I wanted them to hang from the top of the piece and curving to be cut off on the side. I also wanted two, so they would intersect and cover more space.
|
|
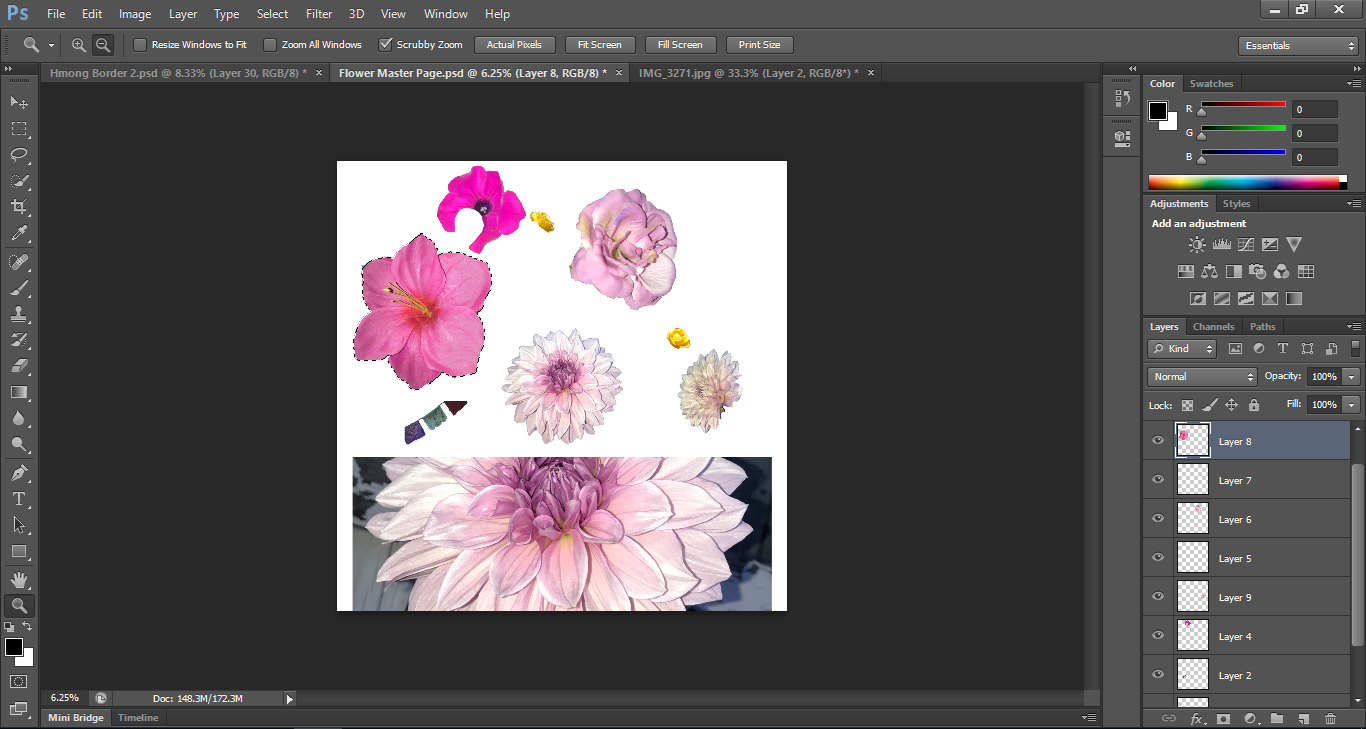
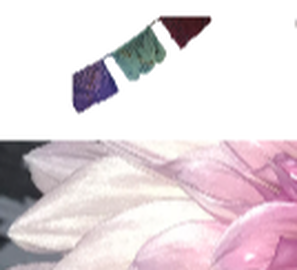
I began working on the Indian garlands first and because I already had pictures of individual flowers from a previous project, I decided to reuse those and save time from painting them. I copied and pasted them using the quick-selection tool and kept them all on one page so I could easily keep track and reference it in the future. However I had to crop the side of one flower in order to place it at the edge of the piece.
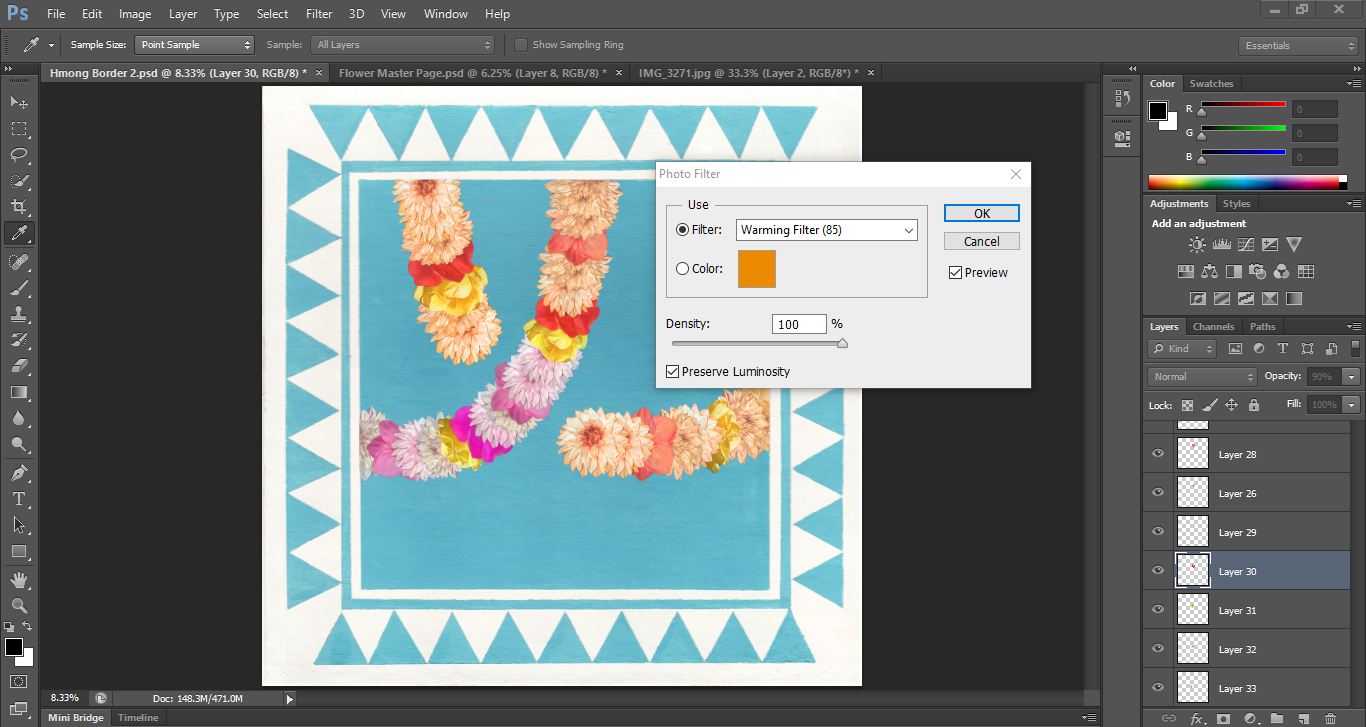
Placing each flower one by one with each a different layer, I carefully laid each flower on top of an other slowly creating the bend to change direction of the string. I used a variety of flowers spread out through the garlands to change the texture from big flowers to flat ones. I also had to change the color of the flowers from pinks and purples to oranges and reds. Traditional garlands don't include a majority of purple, so by using Photo Filter I changed the shades to orange and placed the density at 100%.
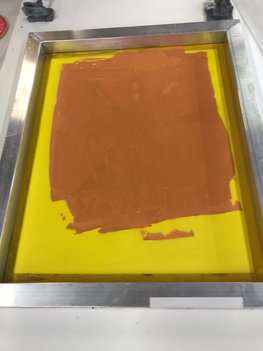
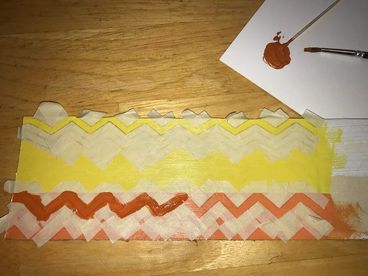
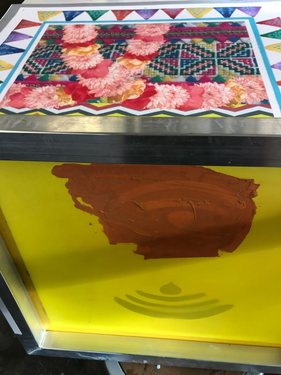
Once the garlands were completed, I began painting the African portion. I painted on the remaining cardboard cut to make the 8x8 square, and it was enough room to paint what was needed. I measured the width of the piece and divided it by 3 so that the yellow to orange ratio was 2:1. I then painted the yellow and orange coats and began using the tape method used in my first project to create the zig zag lines. Using a darker orange, I painted the first outline and repeated the taping process below the line and on the yellow portion with different colors. Space needed to be left in the middle of the piece, however because that would be the place to hold my stencils.
|
After completing the painting for the African portion, it was scanned and digitally put into my piece. Rather than doing the two different African pieces, I decided to conserve time by only recreating one. Next was to input a background, and I felt that the border alone was not enough to represent Hmong culture, so I placed a background of Hmong patterns and designs from a Hmong dress by using the rectangular crop tool to have straight edges, then aligning them with the lines of the border. The opacity was also changed to 80% so it would not distract from the frontal pieces. Finally, the papeles picados were put into place. I ended up changing the type of papeles I was going to use, and how I was going to include them in my piece, Rather than hanging them across the middle like the garlands, I figured their triangular shape would fit perfectly into the triangles around the border, subtly incorporating them while still maintaining the Hmong designs. Using the quick select tool, I outlined different colors of the papeles then copy and pasted them onto my piece. Finally, I used the transformation tool to adjust the size and position of them, and placed them each into their own triangle following no specific color pattern.
|
Like the first process, stencils were needed to be cut and printed using ink and a frame. This process was needed to be completed three times for my second piece in different colors. The colors I chose included orange, dark red and an army green to compliment the outlined zig zags of the African portion. The process of printing, washing and drying the frame was needed after every print to begin printing the same stencil shape with a different color.
|
|
Experimentation
|
For my original idea of papeles picados, I imagined the square. paper mache styled paper. Since it's part of my culture, I already had a few photographs including papeled picados in them. My idea was to use the quick select tool and copy and paste them to enlarge them onto my bigger final piece. However, the only images I had of them included them being in only the background of the photo, and not the actual subject of it. This lead to poor resolution once the outline was blown up to its intended size, and leading to me finding new papeles picados to photograph on my own.
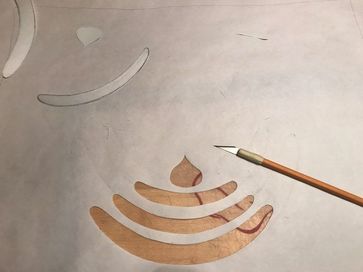
For my stencil, I knew the shape I wanted and how to create it. However, I cut the stencil before I completed the proper measurements to figure out if the stencil would even fit my piece. After calculating, I found that the stencil would only be able to be a maximum of 4 inches tall, which my first stencil exceeded. Thankfully, the stencil did not need to be tampered with regarding size or position. All that was needed was to re cut the stencil, not including the third and bottom stripe. This allowed the stencil to meet the 4 inches requirement and fit nicely onto my piece.
|
Reflection
For my second project, I did not put much thought into it while brainstorming ideas. I was much more focused on the first project, however the more I worked on Color, the more I liked how it was turning out, and it is now my favorite of the two pieces.
Although the inspiration does not come from traditional or popular artists, that does not deny the fact that I was greatly inspired for this piece, by the people around me. For the inspirational piece from the front of the school however, I was not inspired by the style of how it was made or by the colors used. I simply chose to recreate the meaning of diversity and community in my piece, and that something that my inspiration communicated so well.
What I am most proud of in this piece is my ability to pull drastically different patterns and colors together. Pulling traditions from completely differing styles and making it look as if it visually represents unity. The most difficult portion of this piece was completing the tedious tasks of repetitive copying, pasting, and placing. This process occurred throughout the placement of the Indian garlands, placing a new flower for every layer and aligning each, later to change the color and opacity of each and every one. It also occurred throughout the process of placing the papeles picados, using the same copy and paste method. However, instead of changing the colors and opacity, the size and rotation was changed to fit to the size of every different triangle painted for the original Hmong border.
This was my first time communicating diversity and community through art, and I believe I did a well done job while enjoying it. I feel so strongly about representing the color of our community, and this will not be the last time I do through my work.
ACT Responses
Clearly explain how you are able to identify the cause-effect relationships between your inspiration and its effect upon your artwork:
My inspiration caused me to include cultures of all kind that surround me every day. With the Indian garlands specifically, I was able to create my own using Photoshop and pictures of my own flowers.
What is the overall approach (pov) the author (from research) has regarding the topic of your inspiration?
For the Hmong border, the topic was to document and pass on the stories of their experiences coming to America. The bold triangular border was to catch the attention of others to hear their story. Papeles picados are used for Mexican celebrations to bring color to the world, and Indian garlands are also used as celebration decor often seen at weddings to bring good luck.
What kind of generalizations and conclusions have you discovered about people, ideas, cultures, etc. while you researched your inspiration?
I was reminded of how different all people from different cultures view things. Each have their own patterns and designs to represent their culture and beliefs and it reminded me of how colorful the society that we live in is.
What was the central idea or theme around your inspirational research?
The theme was to understand what cultural designs, decorations and traditions were used in each culture and why it was important.
What kind of inferences did you make while reading your research?
Inferences I made were that each culture had its own form of superstition. The Indian garlands were believed to bring good luck to the newly weds while the papeles picados were used to celebrate the Day of the Dead, where Mexican ancestors visit their families.
Bibliography
“Ambesonne African Decorations Collection, African Elements Decorative Historical Original Striped and Rectangle Shapes Artsy Work, Bedroom Living Room Dorm Wall Hanging Tapestry, Multi.” Amazon, Amazon, www.amazon.com/Ambesonne-Decorations-Collection-Decorative-Historical/dp/B01KG1X18K.
“Indian Bridal Flower Garland in Singapore.” Battered Luggage, 12 Apr. 2015, www.batteredluggage.com/2015/indian-bridal-flower-garland-in-singapore/.
“Science Buzz.” Ten Tips on Becoming a Paleontologist, www.sciencebuzz.org/museum/object/2004_08_hmong_story_cloth.
Timlewisnm. “Papel Picado.” Flickr, Yahoo!, 19 Apr. 2010, www.flickr.com/photos/gozalewis/4533466093.
